| Line 1: | Line 1: | ||
| − | {{TabLang|DE|DE|EN|ES|Teddybär|RU}} | + | {{TabLang|DE|DE|EN|ES|{{Teddybär}}|RU}} |
{{ToTrad}} | {{ToTrad}} | ||
Revision as of 00:29, 27 July 2014
(Übersetzung steht noch aus und folgt sobald wie möglich! - if you want to complete it, please update this line so that no one will edit it in the meantime)
The aim of this tutorial is to show how to create cuddly toys based on the models of atysian animals.
Object of the month: creating and deploying cudlly toys "Atys' mobs" in game
Prerequisite for modelising only the cuddly toy:
- Having installed Ryzom assets and properly set-up the repositories (NEL tools expect to find the assets in the W:\database folder).
- Having installed 3DSMax and set-up the NEL plugin (Beware the plugin works only with versions 32bits of 3DSMax, and from version 9 till version 2012).
- Advised but not mandatory: having installed the NEL tool "tga2dds.exe".
Prerequisite for deploying the cuddly toy on a game server:
- Having compiled and installed a game server, and having set-up a client to use it.
Note: it is possible to test this cuddly toy IG without having a game server through a trick which will be explained a bit further in this tutorial.
Some usefeul linkds for these prerequisites:
- Downloading the assets and tools: https://ryzomcore.atlassian.net/wiki/display/RC/Downloads+for+Windows
- Set-up of the readers: https://ryzomcore.atlassian.net/wiki/display/RC/How+to+set+up+the+Build+Pipeline
- Insalling the NEL plugin of 3DSMax: https://ryzomcore.atlassian.net/wiki/display/RC/Installing+the+Max+Plugins
Step 1: choosing the model we'll use for our cuddly toy
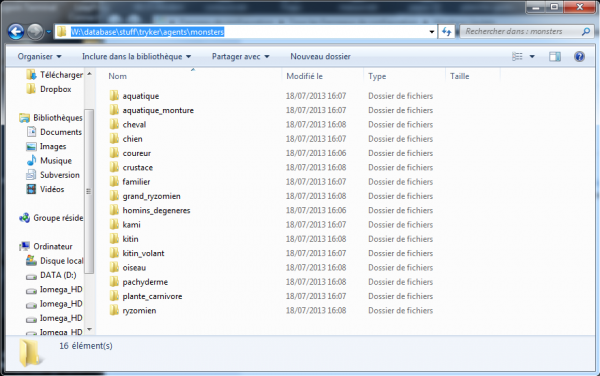
All 3d models for Ryzom fauna are gathered in the "W:\database\stuff\tryker\agents\monsters" folder, by creature family. In this tutorial, we'll use the "Gubani" model, which is located in the "horse" ("cheval" in French) folder, to create our cuddly toy:
W:\database\stuff\tryker\agents\monsters\cheval\h12tr_mo_h12.max
Step 2: Getting the model and creating a dedicated work folder
In 3DSMax, open the "W:\database\stuff\tryker\agents\monsters\cheval\h12tr_mo_h12.max" file.
Use the menu => "File" => "Manage" => "Asset Tracking" to check the list of the files used in this model, especially the textures. Notice this two files:
- The 3d model: "tr_mo_h12.max"
- The texture for the gubani: "ju_mo_h12.png"
The aim here is to deploy cuddly monbs for the month object. Hence, we'll create a dedicated folder for our to-be toys and respect the naming convention used by Ryzom.
So we'll create a "soft-toy" folder, in the "W:\database\stuff\generique\agents\accessories" folder. We'll save our model by renaming it under: ge_acc_teddy-gubani_01.max
- the first "ge_" prefix in the file name specifies the ecosystem, here _ge_neric (tr: tryker, fy: fyros, etc...).
- the second prefix in the file name specifies the type of model (hom: male homin, mo: monster, wea: weapon, etc...). Here "acc" for _acc_essory.
- and last, the name of our model "teddy-gubani", which will be suffixed with a number, in order to be able to create several variants of the teddy-gubani.
For the texture, we should also copy it under "W:\database\stuff\generique\agents\_textures\accessories", but we'll do it more simply. We'll place it in the same folder as the 3d model and rename it according to the same convention: "ge_acc_teddy-gubani_01.png".
Ryzom core knwo only how to show textures with a ".tga" or ".dds" format. TGA is a raw format without compression which makes it useful for edition, but less efficient in term of memory space. DDS format is a compressed image format which, as jpeg, is destructive. It is the format used internally by Ryzom to minimize the textures' memory space. With your favorite editor, convert the ".png" image into a ".tga" one. That's the one we'll keep for edition. We'll use the NEL tool "'tga2dds'" to generate a texture image under ".dds" format for the 3d model. That's the one which well be used in 3DSMax.
tga2dds ge_acc_teddy-gubani_01.tga
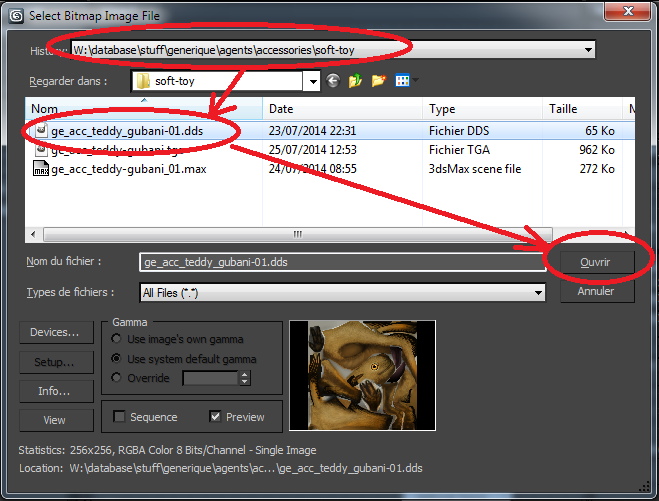
If you don't have this tool, you gan keep the ".tga" version. It will work for the IG tests. In the "soft-toy" folder, you should now have as a result:
Step 3: Cleaing the 3D model using 3DSMax
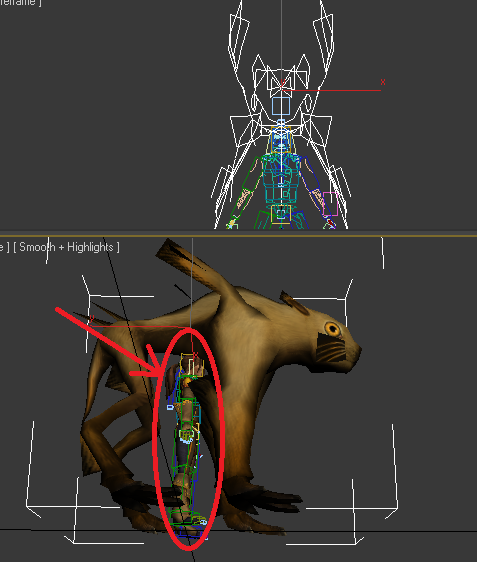
The monster 3D model contains a skeleton and animation tracks. This is not necessary for a toy accessory and unnecessarily overburden the final ryzom model. We will delete it.
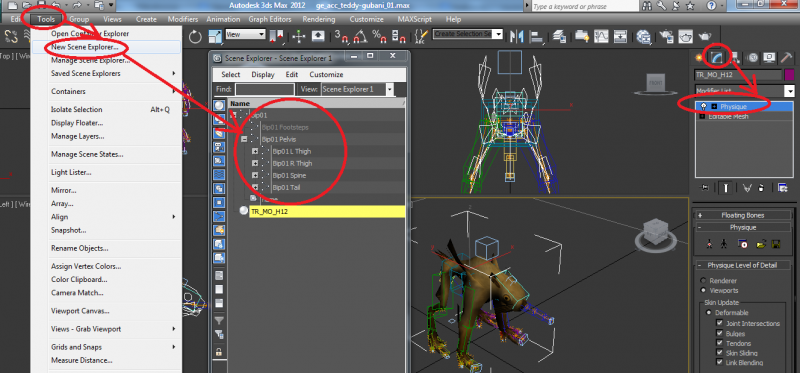
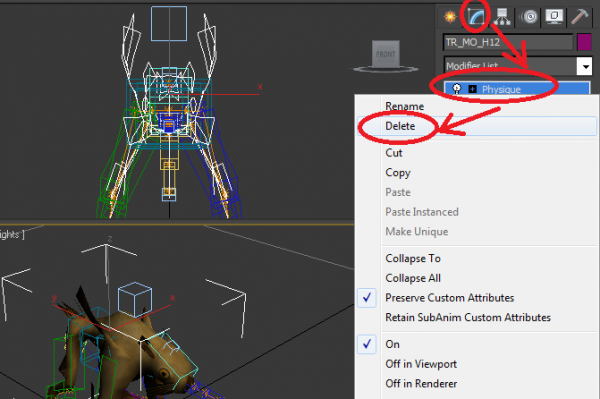
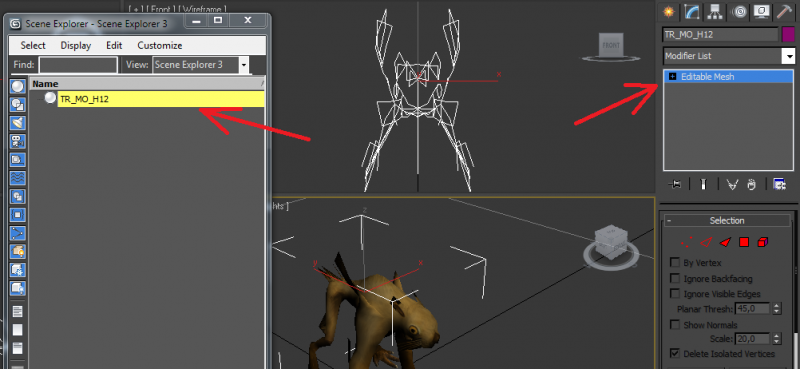
Select with the mouse the "Gubani" model. In the right panel, select the "modify" tab. You should see the mesh called "TR_MO_H12" and in the stack one modifier called "physical". We will delete
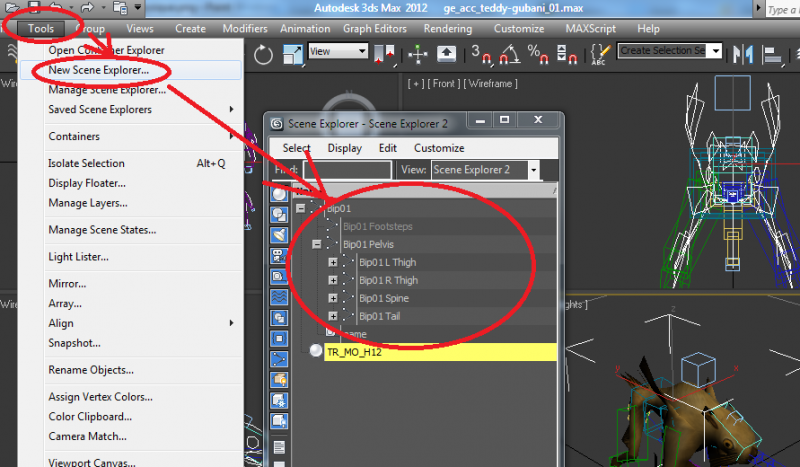
Ensuite nous allons ouvrir l'écran affichant les éléments de la scene via le menu "Tools"=> "New Scene Explorer" et supprimer tous les éléments constituant le squelette du modèle pour ne garder au final que le mesh de l'animal.
Then we will open the scene explorer screen via the "Tools" menu => "New Scene Explorer" and delete all the elements constituting the skeleton of the model and keep only the animal mesh.
Now we have only one element in our "scene": the Gubani mesh "TR_MO_H12"
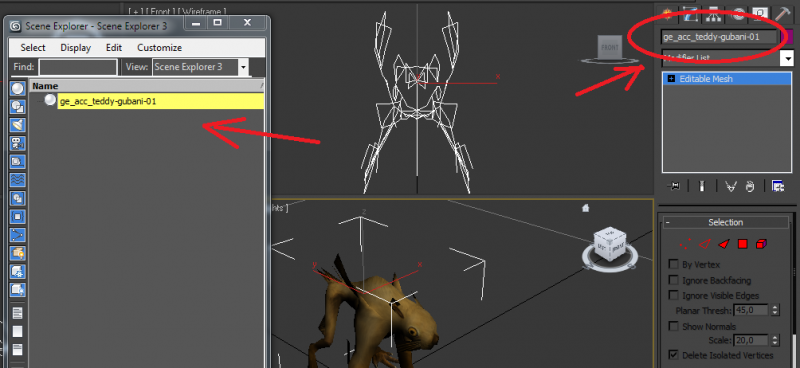
In the right panel, we will rename the mesh "ge_acc_tedy-gubani_01". This name will be used by the export "NEL" to name the generated file when exporting to "shape" NEL format.
Étape 4 : Modifier le mapping des textures du modèle
Dans cette partie, nous allons revoir la texturation du modèle 3d. A priori, il faudrait juste changer la texture de base «ju_mo_h12.png» pour pointer sur la notre «ge_acc_teddy-gubani_01.dds» (ou «.tga» à défaut) puis l'adapter comme nous le voulons visuellement. Cependant, cela va être un peu plus compliqué :
In this section, we will adapt the texturing of 3d model. In principle, we would just change the base texture "ju_mo_h12.png" to point to our "ge_acc_teddy-gubani_01.dds" texture (or the ". tga" one). However, this will be a bit more complicated:
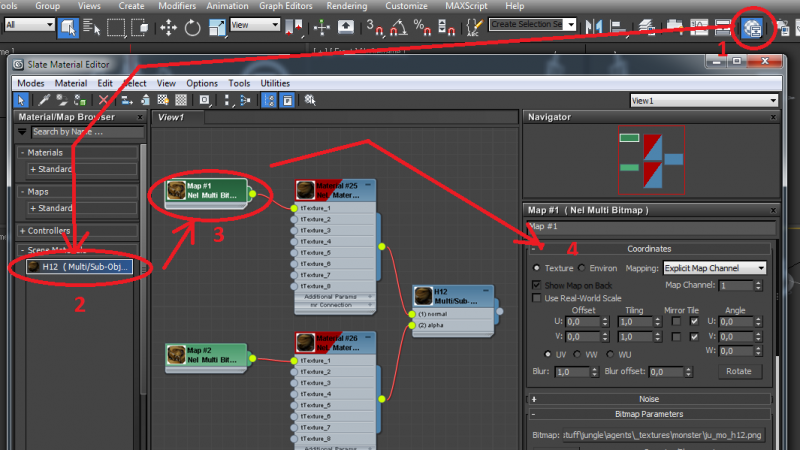
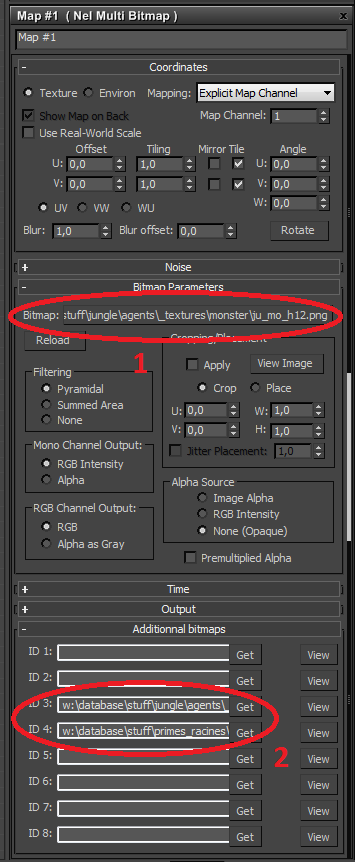
First we open the "Material Editor" (1) screen, then we select the unique material of the scene (2) by double clicking on it. In the central viewport select the node named "Map # 1 Nel Multi Bitmap" by double clicking on it (3). In the right sidebar, a description of its properties (4) appear. The "Nel Multi Bitmap" allow to specify 8 different images. It is not multi-texturing, but the ability to configure multiple texture images. Only one is applied at a given moment on the model. This is used for the mobs to specify one texture for each ecosystem. This is also used by and environmental objects to specify a different texture for each season.
The ID 1 slot is used for textures of Tryker ecosystem, the second solt (ID 2) for the Fyros ecosystem Fyros. The third slot (ID 3) for Zoraï ecosystem and the fourth one (ID 4) for the Primes Root ecosystem. Do not look for Matis slot. As good aesthetes, they understood that beauty lay in the Zorai nature and therefore use Zoraï textures for all their animals. Note that here the Gubani is being ponly resent in jungle primes root. Only slots 3 and 4 are used
The same system is also used for other IG objects, such as buildings. In this case, the 4 slots correspond to the four seasons. Thus we can note the presence of snow on some Zoraï buildings in winter.
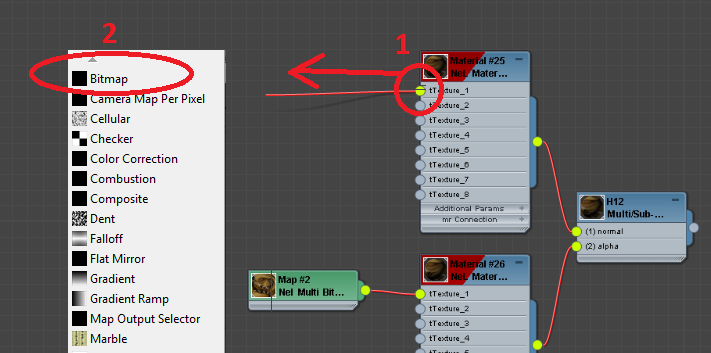
We will not use this mechanism. We will therefore deleted the "NEL Multi Bitmap" and replace it with a simple "Bitmap" by dragging the mouse from the output of "1 tTexture 1" as shown in the above image. When release the mouse, a menu appears (2), select "Bitmap" entry:
Then select our texture "W:\database\stuff\generic\agents\ _textures\accessories\ oft-toyge_acc_teddy gubani_01.dds" (or ".tga").
Repeat the operation on the other "Nel Multi Bitmap" which reference the same image.
Étape 5 : Scaling the model
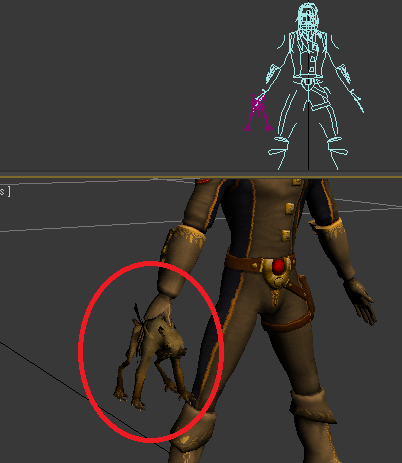
Our 3d model is almost ready. However, its size does not match what expected. If you use the 3dsmax measuring tool you will see that the Gubani is 2m high. The simplest way to put it in the right size is to load a Homin model to have visual comparison and ensure that the teddybear can be taken in hand.
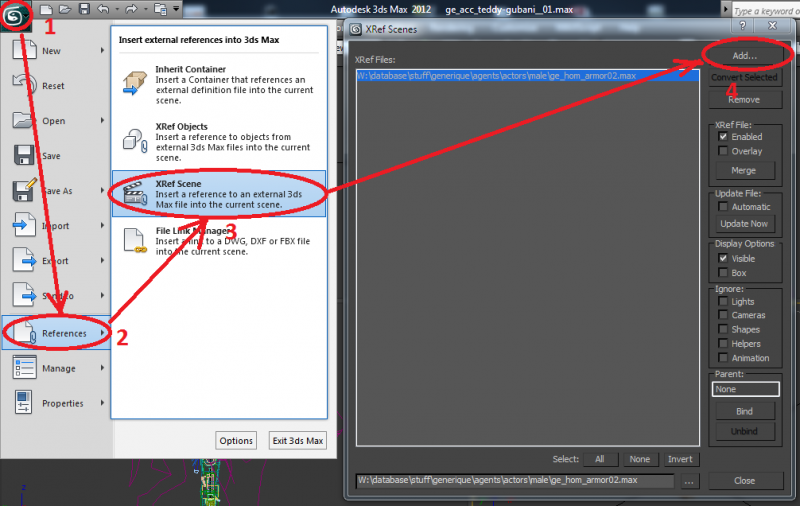
So we will temporarily put in our scene a reference to another 3d model via the File menu (1) => References (2) => Xref Scene (3) and then clicking on the Add button (4) :
Select the Homin model "W:\database\stuff\generic\agents\actors\male\ge_hom_armor02.max" which should appear in your 3d scene.
Scale the Gubani modeland move via tools "Scale" and "Move" from the popup menu that appears when you click the model with the right mouse button.
Once at the right scale, remove the reference to the homin model through the File menu => References => Xref Scene.
Reposition the Gubani model at the scene origin (x = 0, y = 0, z = 0), because when the object is carried the position (0,0,0) is located in the hand.
Sources
https://khaganat.net/wikhan/fr:todo:dessiner:peluche
