From Ryzom Forge Wiki
The aim of this tutorial is to show how to create cuddly toys based on the models of atysian animals.
Contents
- 1 Object of the month: creating and deploying cudlly toys "Atys' mobs" in game
- 1.1 Step 1: choosing the model we'll use for our cuddly toy
- 1.2 Step 2: Getting the model and creating a dedicated work folder
- 1.3 Step 3: Cleaing the 3D model using 3DSMax
- 1.4 Step 4: Map the right texture to the model
- 1.5 Step 5: Scaling the model
- 1.6 Step 6: Adapt the texture for a fluffy look
- 1.7 Step 7: Shape export
- 1.8 Step 8: Testing the plushy IG
- 1.9 Step 9: Orientating and positionning an object hold in hand
- 1.10 Step 10: Creating the icone for inventory and actions bar
- 1.11 Step 11: Creating the names file
- 1.12 Step 12: Creating the datasheet
- 1.13 Step 13: Deploying the soft-toy on the game server and client
- 1.13.1 Adding the "teddygubani.sitem" datasheet to the server
- 1.13.2 Cleaning beforehand
- 1.13.3 Re-generating the "sheet_id.bin" file
- 1.13.4 Re-generating the "*.packed_sheets" and "visual_slot.tab"
- 1.13.5 Copying the needed files on the client side
- 1.13.6 Creating a bnp for the soft-toy model
- 1.13.7 Testing IG
- 2 Sources
Object of the month: creating and deploying cudlly toys "Atys' mobs" in game
Prerequisite for modelising only the cuddly toy:
- Having installed Ryzom assets and properly set-up the repositories (NEL tools expect to find the assets in the W:\database folder).
- Having installed 3DSMax and set-up the NEL plugin (Beware the plugin works only with versions 32bits of 3DSMax, and from version 9 till version 2012).
- Advised but not mandatory: having installed the NEL tool "tga2dds.exe".
Prerequisite for deploying the cuddly toy on a game server:
- Having compiled and installed a game server, and having set-up a client to use it.
Note: it is possible to test this cuddly toy IG without having a game server through a trick which will be explained a bit further in this tutorial.
Some useful links for these prerequisites:
- Downloading the assets and tools: https://ryzomcore.atlassian.net/wiki/display/RC/Downloads+for+Windows
- Set-up the drive letter for the assets : https://ryzomcore.atlassian.net/wiki/display/RC/How+to+set+up+the+Build+Pipeline
- Insalling the NEL plugin of 3DSMax: https://ryzomcore.atlassian.net/wiki/display/RC/Installing+the+Max+Plugins
Step 1: choosing the model we'll use for our cuddly toy
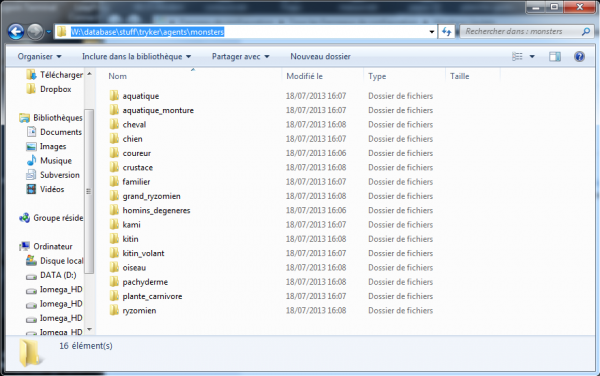
All 3d models for Ryzom fauna are gathered in the "W:\database\stuff\tryker\agents\monsters" folder, by creature family. In this tutorial, we'll use the "Gubani" model, which is located in the "horse" ("cheval" in French) folder, to create our cuddly toy:
W:\database\stuff\tryker\agents\monsters\cheval\h12tr_mo_h12.max
Step 2: Getting the model and creating a dedicated work folder
In 3DSMax, open the "W:\database\stuff\tryker\agents\monsters\cheval\h12tr_mo_h12.max" file.
Use the menu => "File" => "Manage" => "Asset Tracking" to check the list of the files used in this model, especially the textures. Notice this two files:
- The 3d model: "tr_mo_h12.max"
- The texture for the gubani: "ju_mo_h12.png"
The aim here is to deploy cuddly mobs for the month object. Hence, we'll create a dedicated folder for our to-be toys and respect the naming convention used by Ryzom.
So we'll create a "soft-toy" folder, in the "W:\database\stuff\generique\agents\accessories" folder. We'll save our model by renaming it under: ge_acc_teddy-gubani_01.max
- the first "ge_" prefix in the file name specifies the ecosystem, here _ge_neric (tr: tryker, fy: fyros, etc...).
- the second prefix in the file name specifies the type of model (hom: male homin, mo: monster, wea: weapon, etc...). Here "acc" for _acc_essory.
- and last, the name of our model "teddy-gubani", which will be suffixed with a number, in order to be able to create several variants of the teddy-gubani.
For the texture, we should also copy it under "W:\database\stuff\generique\agents\_textures\accessories", but we'll do it more simply. We'll place it in the same folder as the 3d model and rename it according to the same convention: "ge_acc_teddy-gubani_01.png".
Ryzom core knows only how to show textures with a ".tga" or ".dds" format. TGA is a raw format without compression which makes it useful for edition, but less efficient in term of memory space. DDS format is a compressed image format which, as jpeg, is destructive. It is the format used internally by Ryzom to minimize the textures' memory space. With your favorite editor, convert the ".png" image into a ".tga" one. That's the one we'll keep for edition. We'll use the NEL tool "'tga2dds'" to generate a texture image under ".dds" format for the 3d model. That's the one which well be used in 3DSMax.
tga2dds ge_acc_teddy-gubani_01.tga
If you don't have this tool, you gan keep the ".tga" version. It will work for the IG tests. In the "soft-toy" folder, you should now have as a result:
Step 3: Cleaing the 3D model using 3DSMax
The monster 3D model contains a skeleton and animation track. This is not necessary for a toy accessory and unnecessarily overburden the final ryzom model. We will delete it.
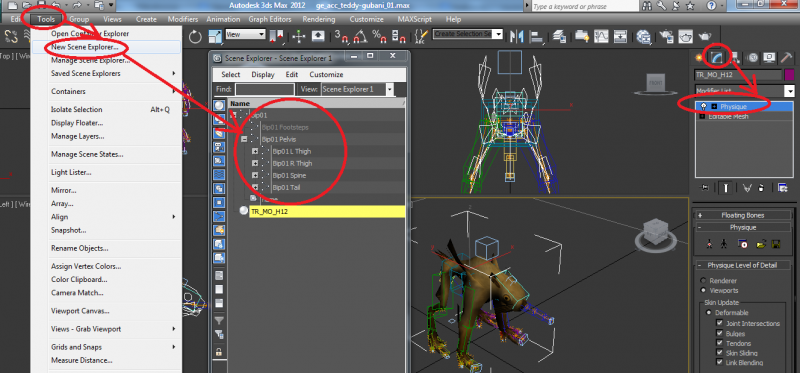
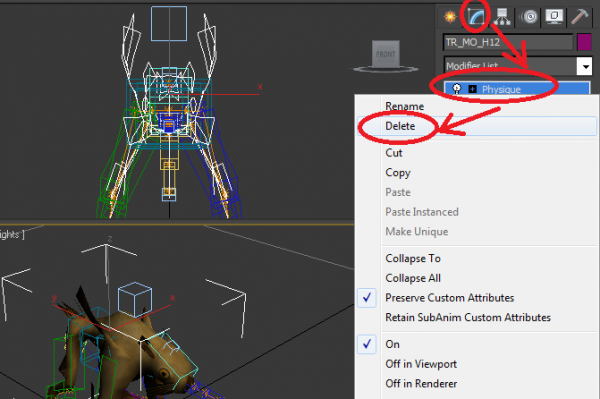
Select with the mouse the "Gubani" model. In the right panel, select the "modify" tab. You should see the mesh called "TR_MO_H12" and in the stack one modifier called "physical". We will delete it also.
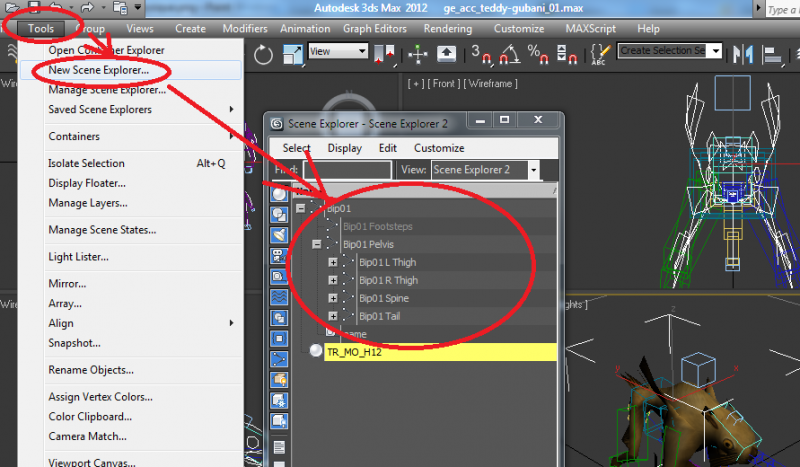
Then we will open the scene explorer screen via the "Tools" menu => "New Scene Explorer" and delete all the elements constituting the skeleton of the model and keep only the animal mesh.
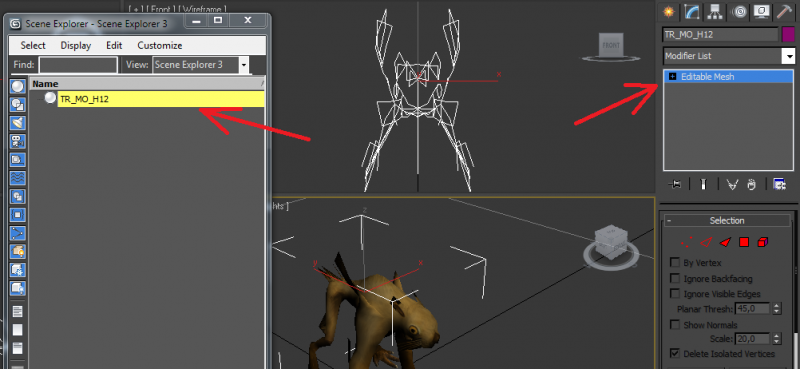
Now we have only one element in our "scene": the Gubani mesh "TR_MO_H12"
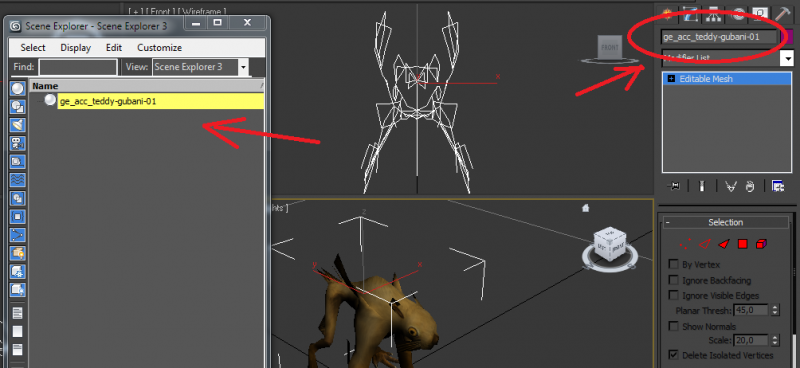
In the right panel, we will rename the mesh "ge_acc_tedy-gubani_01". This name will be used by the export "NEL" to name the generated file when exporting to "shape" NEL format.
Step 4: Map the right texture to the model
In this section, we will adapt the texturing of 3d model. In principle, we would just change the base texture "ju_mo_h12.png" to point to our "ge_acc_teddy-gubani_01.dds" texture (or the ". tga" one). However, this will be a bit more complicated:
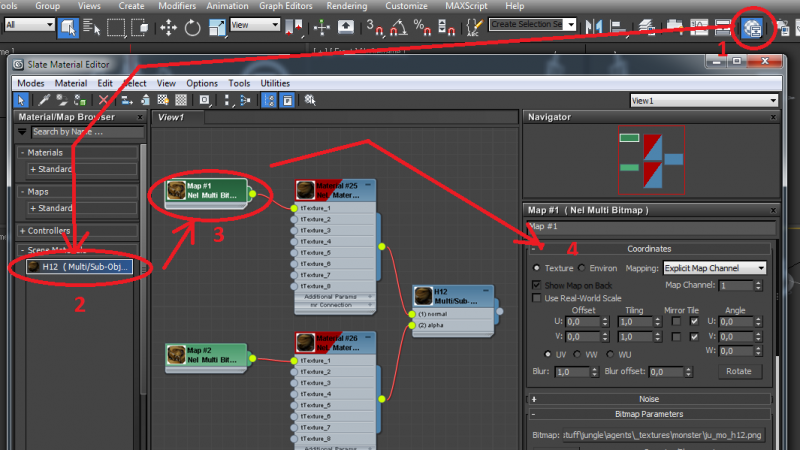
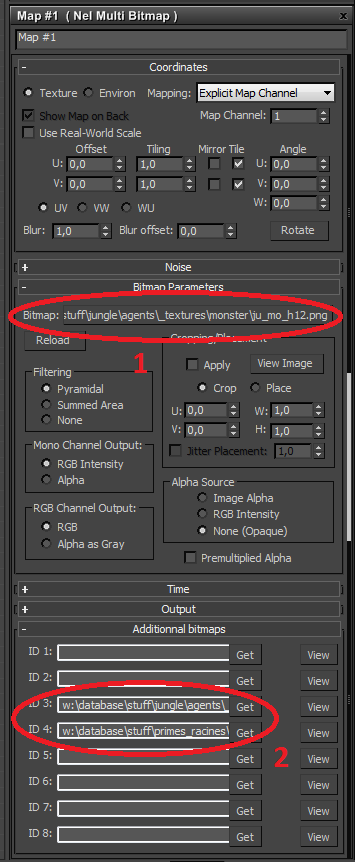
First we open the "Material Editor" (1) screen, then we select the unique material of the scene (2) by double clicking on it. In the central viewport select the node named "Map # 1 Nel Multi Bitmap" by double clicking on it (3). In the right sidebar, a description of its properties (4) appears. The "Nel Multi Bitmap" allows to specify up to 8 different images. It is not multi-texturing, but the ability to configure multiple texture images. Only one is applied at a given moment on the model. This is used for the mobs to specify one texture for each ecosystem. This is also used by environmental objects to specify a different texture for each season.
The ID 1 slot is used for textures of Tryker ecosystem, the second slot (ID 2) for the Fyros ecosystem. The third slot (ID 3) for Zoraï ecosystem and the fourth one (ID 4) for the Primes Root ecosystem. Do not look for Matis slot. As good aesthetes, they understood that beauty lay in the Zorai nature and therefore use Zoraï textures for all their animals. Note that here the Gubani is being only present in jungle and primes root. Only slots 3 and 4 are used
The same system is also used for other IG objects, such as buildings. In this case, the 4 slots correspond to the four seasons. Thus we can note the presence of snow on some Zoraï buildings in winter.
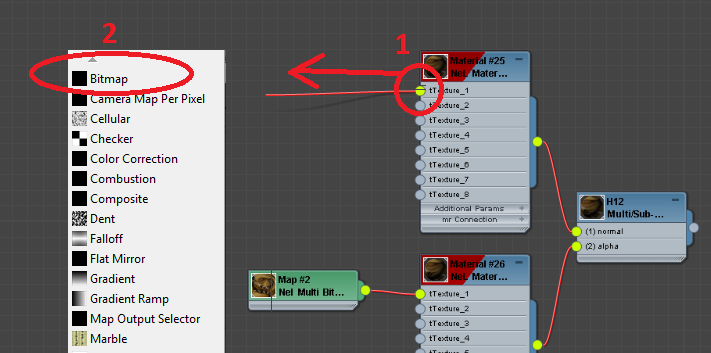
We will not use this mechanism. We will therefore delete the "NEL Multi Bitmap" and replace it with a simple "Bitmap" by dragging the mouse from the output of "tTexture 1" as shown in the above image. When releasing the mouse, a menu appears (2), select "Bitmap" entry:
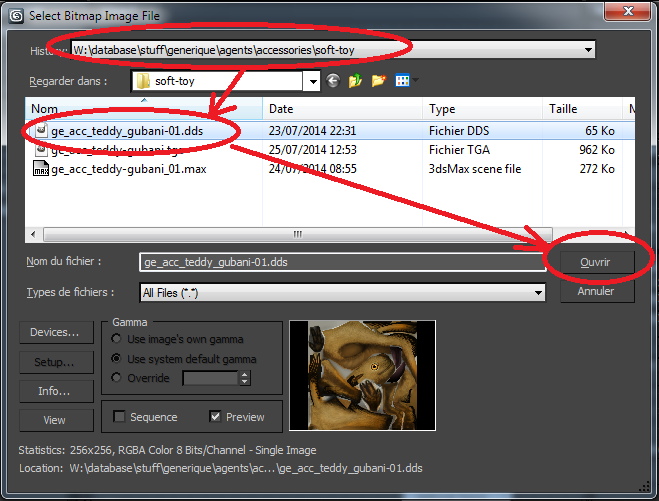
Then select our texture "W:\database\stuff\generic\agents\ _textures\accessories\ oft-toyge_acc_teddy gubani_01.dds" (or ".tga").
Repeat the operation on the other "Nel Multi Bitmap" that reference the same image.
Step 5: Scaling the model
Our 3d model is almost ready. However, its size does not match what is expected. If you use the 3dsmax measuring tool you will see that the Gubani is 2m high. The simplest way to put it in the right size is to load a Homin model to have visual comparison and ensure that the teddybear can be taken in hand.
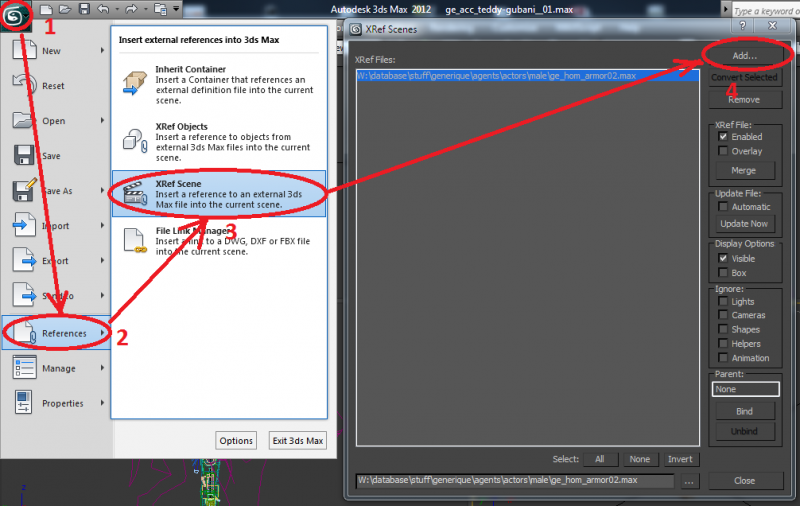
So we will temporarily put in our scene a reference to another 3d model via the File menu (1) => References (2) => Xref Scene (3) and then clicking on the Add button (4) :
Select the Homin model "W:\database\stuff\generic\agents\actors\male\ge_hom_armor02.max" which should appear in your 3d scene.
Scale the Gubani model and move it via tools "Scale" and "Move" from the popup menu that appears when you click the model with the right mouse button.
Once at the right scale, remove the reference to the homin model through the File menu => References => Xref Scene.
Reposition the Gubani model at the scene origin (x = 0, y = 0, z = 0), because when the object is carried the position (0,0,0) is located in the hand.
Step 6: Adapt the texture for a fluffy look
In terms of texture, to give a "plushy effect", give free rein to your imagination
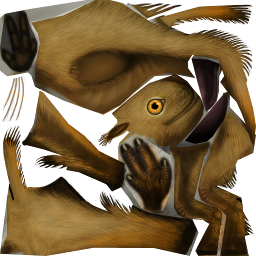
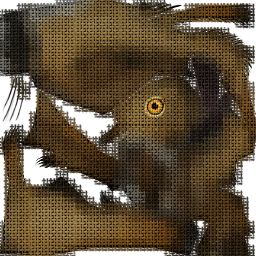
I edited the "ge_acc_teddy-gubani_01.tga" image with the Gimp application. I used the filter "Artistic> GIMPressionist" using the "canvas" model for a weft fabric effect.
Once the image saved, I re-generated the dds texture with the command:
tga2dds ge_acc_teddy-gubani_01.tga
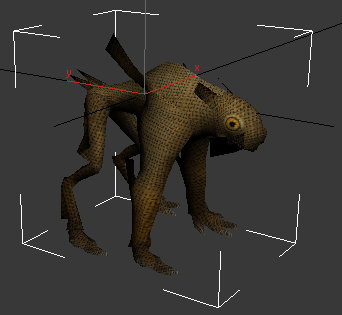
Here is the result on the 3d model in 3dsmax:
Step 7: Shape export
It's time to test the teddybear IG. For this you have to export the model to the "shape" file used by the Ryzom engine
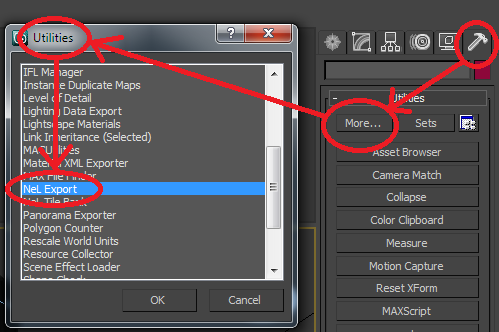
If this is not already done, add the NEL export button on your right side panel by clicking on the "utilities" tab then "More" button and selecting the "NEL Export" option:
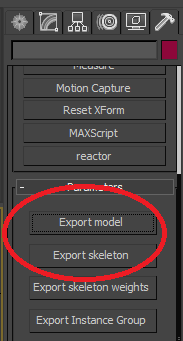
Then select the Gubani mesh with the mouse and click on the "Export Model" button. You must specify the folder in which the file "ge_acc_teddy-Gubani-01.shape" will be created.
Step 8: Testing the plushy IG
If we wanted to do it by the book, we should add the "datasheet" for the teddy-gubani on the game server and patch the client. This method will be detailed later. However there is a workaround if you don't have your own game server to do these steps.
You have to know that a plushy is nothing more that a weapon hold in hand. So we could replace the model of the dagger with the one of our gubani to test it on the official server. There is a simple trick for this. The game client looks for the models and textures in the "user" folder before trying in the "data" folder. Just copy the shape file and the associated texture in the "user" folder, then rename the gubani shape into the one of the dagger: "GE_Wea_Dague.shape"
Now, when you'll take a dagger IG, you'll hold the "teddy-gubani". To retrieve the original dagger, you just have to remove the shape file from the "user" folder:
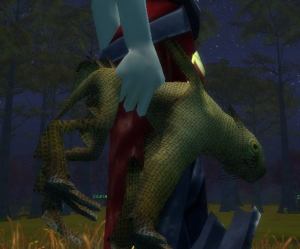
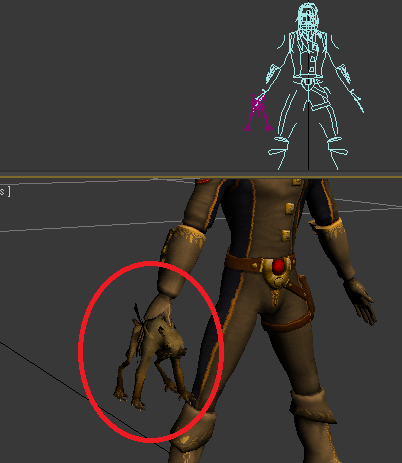
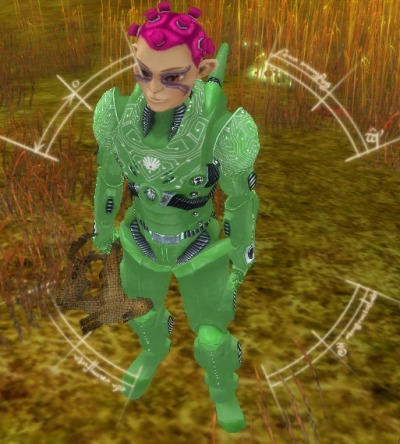
By doing this test, you can notice an anomaly: the toy is hold by its foot, which isn't necessarily what we want.
Step 9: Orientating and positionning an object hold in hand
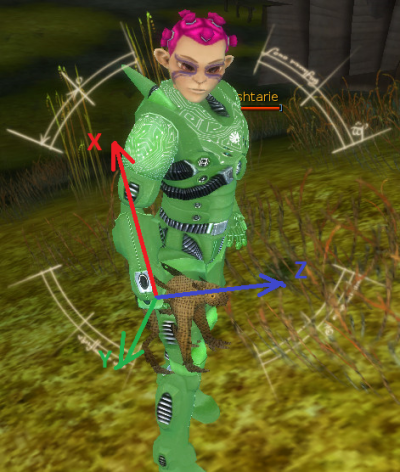
The fastening point for an object hold in hand is at the point with (0,0,0) coordinates of the object. Its orientation obeys the following rule:
 X axe goes up along the forearm;
 Y axe starts from the back of the hand towards outside;
 Z axe points towards the top of the object firmly hold in hand.
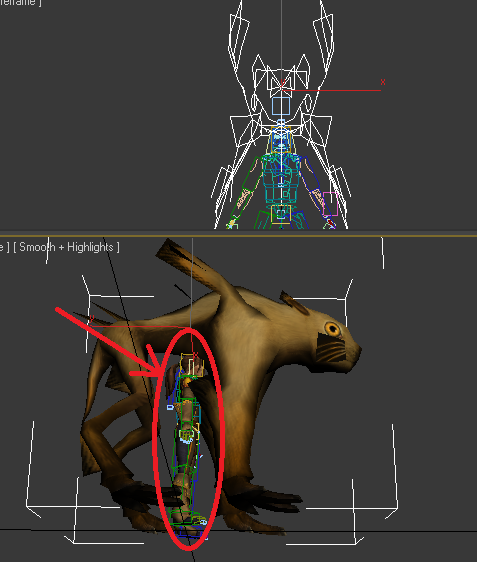
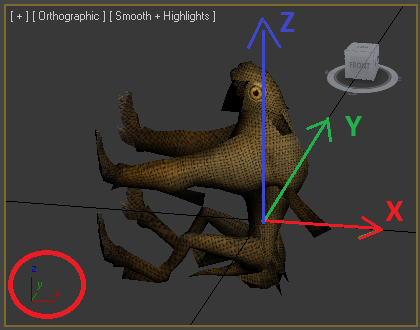
We realign the teddy-gubani in 3DSMax as shown in the following image: X axe exits the gubani's deck to go up the arm that will hold it. Z axe exist the hand and is hence probably in the extension of the soft-toy's head:
After realigning the gubani model and re-exporting the shape, we get a plushy which is hold by its trunk:
If you want to know more about objects held, you can read this tutorial (still in French for now - link to be modified when translation is available): http://forge.ryzom.com/wiki/Objet_prehensible
Step 10: Creating the icone for inventory and actions bar
You have to create an icon to show the teddy-gubani item in the inventory and in the action bar. This icon in tga format has do be of size 40x40 pixels, with a transparent background. We'll name it "icon_teddygubani.tga"
The 40x40 pixels icon:
For performance reasons, these icones aren't stored individually but gathered under one single image names: "texture_interfaces_v3.tga". The text file associated to it is called "texture_interfaces_v3.txt" and provides the list of all present icons and their position in the image:
The text file uses the following format for each line:
NomFichierIcone u1 v1 u2 v2
Where:
- u1,v1 is the position of the upper left corner of the icon
- u2,v2 is the position of the lower righ corner of the icon
Unlike coordinates in pixels, these coordinates are using the 3D UV Mapping technique, and have their valeus in [0 .. 1] interval. The (0,0) coordinate is the upper left corner of the image and (1,1) is the bottom right corner of the image.
Passing from one system to the other one is simple. Let (x1,y1) be the place of the upper left corner of our icon in the global image and (x2,y2) the place for its bottom right corner, then:
- u1 = x1 / image width
- v1 = y1 / image height
- u2 = x2 / image width
- v2 = y2 / image height
Knowhing that the "texture_interfaces_v3.tga" texture has a size of 1024x1024 pixels, and that in the example the "icon_teddygubani.tga" icon is located in position (x1=118,y1=798), that the bottom left corner is in (x2=157,y2=837), the text file contains the line:
icon_teddygubani.tga 0.115234375 0.779296875 0.1533203125 0.8173828125
Even if it can be added by hand, the proper way to do it is to use the dedicated NEL tool build_interface, as explained in the http://khaganat.net/wikhan/fr:creer_icone_objet (still in French also), which recreate the global texture and the txt file from a folder with all the icons.
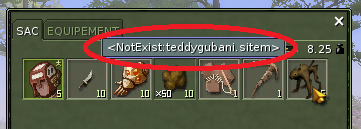
Nota: Adding the icon isn't enough, you'll also have to create the datasheet for the soft-toy object and specify in it the name of the icon to be used, as will be seen later in this tutorial. By the end, we're getting the following result IG:
Step 11: Creating the names file
To be completed.
Step 12: Creating the datasheet
Basically, a soft-toy remains an object held like a weapon. Actually, the datasheet for the soft-toy is very similar to the one of a one-handed weapon, such as the dagger's example below.
__icrm1pd.sitem ( datasheet for the refugee dagger):__
<?xml version="1.0"?>
<FORM Revision="$Revision: 1.2 $" State="modified">
  <PARENT Filename="_c_m1pd.sitem"/>
  <STRUCT>
    <STRUCT Name="basics">
      <ATOM Name="name" Value="refugee dagger"/>
      <ATOM Name="origin" Value="refugee"/>
      <ATOM Name="Drop or Sell" Value="false"/>
      <ATOM Name="CraftPlan" Value="bcrmea06.sbrick"/>
      <ATOM Name="Saleable" Value="false"/>
    </STRUCT>
    <STRUCT Name="3d">
      <ATOM Name="shape" Value="GE_Wea_Dague.shape"/>
      <ATOM Name="shape_female" Value="GE_Wea_Dague.shape"/>
      <ATOM Name="map_variant" Value="Low Quality"/>
      <ATOM Name="icon background" Value="BK_generic.tga"/>
      <STRUCT Name="fx">
        <ATOM Name="Trail" Value="GE_Wea_Dague_trail_00.shape"/>
      </STRUCT>
    </STRUCT>
  </STRUCT>
  <STRUCT/>
  <STRUCT/>
  <STRUCT/>
  <STRUCT/>
  <LOG>
</FORM>
What will be changed is:
- the reference for the shape in the "3d" section
     <ATOM Name="shape" Value="ge_acc_teddy-gubani_01.shape"/>
     <ATOM Name="shape_female" Value="ge_acc_teddy-gubani_01.shape"/>
- the reference for the icon used in the action bar and in the inventory in the "3d" section
     <ATOM Name="icon" Value="icon_teddygubani.tga"/>
     <ATOM Name="icon overlay" Value="icon_teddygubani.tga"/>
- the base features which differ from the ones of a weapon: no level required, no craft stanza, etc...
   <STRUCT Name="basics">
     <ATOM Name="name" Value="staff"/>
     <ATOM Name="origin" Value="common"/>
     <ATOM Name="family" Value="handled item"/>
     <ATOM Name="ItemType" Value="Staff"/>
     <ATOM Name="Bulk" Value="5"/>
     <ATOM Name="RequiredCharacQualityFactor" Value="0"/>
     <ATOM Name="RequiredCharacQualityOffset" Value="0"/>
   </STRUCT>
Here is then the datasheet for the teddy-gubani which will be called "teddygubani.sitem":
<?xml version="1.0"?>
<FORM Revision="$Revision: 1.7 $" State="modified">
  <PARENT Filename="_c_m1pd.sitem"/>
  <STRUCT>
    <STRUCT Name="basics">
      <ATOM Name="name" Value="staff"/>
      <ATOM Name="origin" Value="common"/>
      <ATOM Name="family" Value="handled item"/>
      <ATOM Name="ItemType" Value="Staff"/>
      <ATOM Name="Bulk" Value="5"/>
      <ATOM Name="RequiredCharacQualityFactor" Value="0"/>
      <ATOM Name="RequiredCharacQualityOffset" Value="0"/>
    </STRUCT>
    <STRUCT Name="3d">
      <ATOM Name="shape" Value="ge_acc_teddy-gubani_01.shape"/>
      <ATOM Name="shape_female" Value="ge_acc_teddy-gubani_01.shape"/>
      <ATOM Name="map_variant" Value="Low Quality"/>
      <ATOM Name="icon" Value="icon_teddygubani.tga"/>
      <ATOM Name="icon background" Value="BK_generic.tga"/>
      <ATOM Name="icon overlay" Value="icon_teddygubani.tga"/>
      <STRUCT Name="fx">
        <ATOM Name="Trail" Value="GE_Wea_Dague_trail_00.shape"/>
      </STRUCT>
    </STRUCT>
  </STRUCT>
  <STRUCT/>
  <STRUCT/>
  <STRUCT/>
  <STRUCT/>
  <LOG></LOG>
</FORM>
Step 13: Deploying the soft-toy on the game server and client
In order to deploy the soft toy in game, the official method consists in using the "build_gamedata" pipeline (cf. https:ryzomcore.atlassian.net/wiki/display/RC/Gamedata+Build+Pipeline). I'll propose you a different method, where the actions will be done by hand but only the ones required for the soft-toy:
We'll need the following files:
- teddygubani.sitem (the datasheet for the teddy-gubani)
- ge_acc_teddy-gubani_01.shape (the 3d NEL model for the soft-toy)
- ge_acc_teddy-gubani_01.dds (the texture for the 3d model)
Moreover, deploying this soft-toy will impact the following files:
- the "*.packed_sheets" files used by the server and the client, which are a compiled version of the datasheets
- the "sheet_id.bin" file, which is an index of all the datasheets used by the game
- the "visual_slot.tab" file, which lists the items that can be showed on client side
To work properly, we'll also create a "soft-toy.bnp" file, which will include the shapes and the textures for all the future soft-toys.
For the next operations, we'll consider that our game server uses linux, and that the following environement variable are defined as follow:
- LEVELDESIGNPATH points out the folder for the datas of the level design
- RYZOM_HOME on the install of the server sources
Adding the "teddygubani.sitem" datasheet to the server
On server side, we'll create a folder dedicated to the soft-toys and place the gubani's one there:
 $ mkdir $LEVELDESIGNPATH/leveldesign/game_element/sitem/soft-toy
 $ cp teddygubani.sitem $LEVELDESIGNPATH/leveldesign/game_element/sitem/soft-toy
Cleaning beforehand
Re-generating the "sheet_id.bin" file
The first step consists in regenerating the index file for the datasheets throught the "make_sheet_id" command. It takes over the existing index file and complete it with the datasheets from the $RYZOM_LEVELPATH/leveldesign/game_element/sitem/soft-toy folder, namely the datasheets for our soft-toys.
$ make_sheet_id -o$LEVELDESIGNPATH/leveldesign/Game_elem/sheet_id.bin $LEVELDESIGNPATH/leveldesign/game_element/sitem/soft-toy
Re-generating the "*.packed_sheets" and "visual_slot.tab"
The "*.packed_sheets" have to be regenerated. These are the pre-compiled versions of the datasheets:
$ sheets_packer
This command also regenerate the visual_slot.tab file.
Copying the needed files on the client side
- Copy the "visual_slot.tab" file generated in the current folder into the "user" folder of the game client
- Copy the $LEVELDESIGNPATH/leveldesign/Game_elem/sheet_id.bin file into the "user" folder of the game client
- Replace the packet_sheets files in the "data" folder of the client, with the ones generated in $RYZOM_HOME/code/ryzom/client/data/*.packed_sheets using the sheets_packer command
Creating a bnp for the soft-toy model
To end this, you'll have to copy the shape and the texture of the soft-toy into the "data" folder of the client. However, in order to work cleanly, let's create a dedicaed ".bnp" file. A ".bnp" file is some sort of zip that gathers the various shape, dds, txt, or other files on a same theme.
Let's create a "soft-toy" folder, and copy in it all the shapes and textures for our soft-toys, meaning for now "ge_acc_teddy-gubani_01.shape" and "ge_acc_teddy-gubani_01.dds" and let's create a BNP file to contain them
bnp_make /p soft-toy
The command will create a "soft-toy,bnp" file, which will contain our two files. Now, let's copy it in the "data" folder of the client.
Testing IG
Restart the server with the shard start command and connect with your client.
If everything went well, when starting your game client, you can create a soft-toy in your inventory with this command:
/a createItemInBag teddygubani 1 5
Sources
http://khaganat.net/wikhan/fr:peluche
