From Ryzom Forge Wiki
m |
|||
| Line 1: | Line 1: | ||
| − | {{tabLang|ES|3DSMax DE|3DSMax supports|Soporte 3DSMax|3DSMax FR|3DSMax RU}} | + | {{Migrated to|:es:Soporte 3DSMax}}{{tabLang|ES|3DSMax DE|3DSMax supports|Soporte 3DSMax|3DSMax FR|3DSMax RU}} |
{{toTrad|DE}} | {{toTrad|DE}} | ||
{{ToTrad|FR}} | {{ToTrad|FR}} | ||
Latest revision as of 12:10, 16 August 2018
Migration
Please use the migrated document at URL shown below.
Contents
PLUGINS DE NEL
Descargar los plugins de NeL
Puedes encontra todos los archivos necesarios para Windows aquí: https://ryzomcore.atlassian.net/wiki/display/RC/Downloads+for+Windows
Instalar los Plugins de NeL para 3DS Max
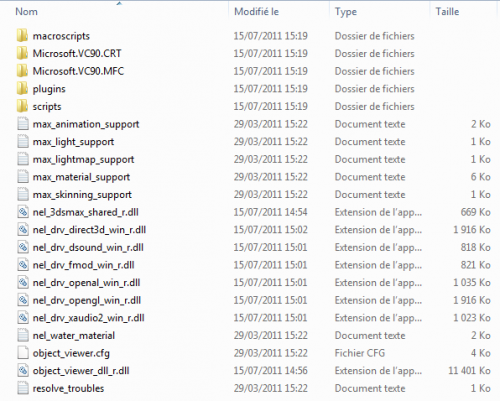
- Simplemente descarga los archivos que necesitas para tu versión de 3DS Max (solo soporta x32 de momento y hasta el 2012) y copia su contenido:
- a tu directorio raíz 3DS Max.
By default the root directory is: C:\Program Files (x86)\Autodesk\3ds Max (version number)
Exporta tu modelo
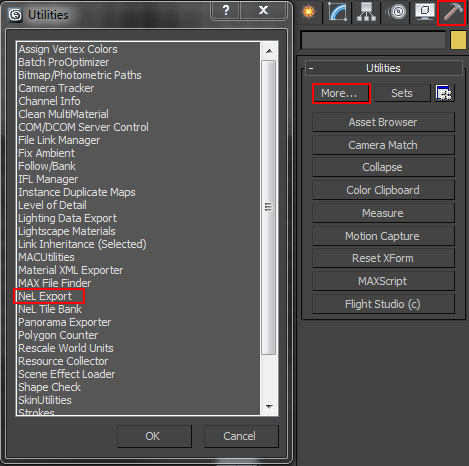
- Cuando tu modelo esté listo para ser exportado usando NeL para el juego: Sólo cambia al panel *Utilities* , selecciona *More...* y en la nueva ventana que aparezca, selecciona *NeL Export* y *OK*.
- Un nuevo panel aparecera a la derecha con los Parametros de los Plugins de Nel. Asegurate de que has seleccionado tu modelo y haz click en Export model o exporta tu modelo en formato .shape.
Exportar un esqueleto
- Tienes que seleccionar el nodo raíz de tu esqueleto y clicka en *Export skeleton* en el panel de los plugins de NeL.
Exportar una animación
- Tienes que seleccionar el nodo raíz de tu esqueleto y clickar en *Export model animations* en el panel de los plugins de NeL.
SOPORTE 3DSMAX
Material de soporte
Cómo usar los lightmaps
- Usa material NeL .
- Comprueba la caja "lightmap".
- Tu material DEBE tener una textura.
- El objeto debe estar mapeado.
- Puedes mapear tu objeto dos veces usand el segundo canal de mapeo para el lightmap. (Usar CopyMap)
PUEDES:
- Lightmap se puede usar con vertex color
- Lightmap puede usarse con alpha test
- El material color difuso se utiliza.
- El material ambiente color se usa.
NO PUEDES:
- Lightmap no puede usarse con alpha vertex
- Lightmap no se puede usar con multitextura
- Lightmap no se puede usar con mapa especular
- El material color especular no se usa
- El material opacidad no se usa
- El material no se puede usar con los parametros extendidos de transparencia extendida (filtro o aditivo)
Como usar color vertex
- Mirar la muestra color vertex.max
- Usa un material NeL.
- Comprueba la caja color vertex.
- Puedes editar to color vertex con vertex paint o edit mesh.
Como usar alpha vertex
- Mirar la muestra alpha vertex.max
- Usa un material NeL.
- Comprueba la caja alpha vertex.
- Elige el canal para usar como alpha. Puedes editar to color vertex con vertex paint o edit mesh.
- Después pégalo con "CopyMap" en el canal seleccionado para alpha vertex.
- La fuente de la copia debe ser 0, el destino el canal que has escogodio en el material NeL
Como usar multitextura
Como usar textura especular
Mira la muestra "specular.max"
Como manejar multiples texturas para un unico material
When selecting a map, you can choose bitmap as a map type, but you can also select Nel Multi Bitmap. With a NeL multi bitmap, you can have 4 sets of maps for a single material. The 'bitmap' slot of the map isn't used anymore, it is just useful to select the currently displayed map. The 4 slots are in the 'Aditionnals bitmap' rollout. If the file name is left blank, that means that there's no map assigned for that slot. The 'Get' button allows you to choose the bitmap, and a 'View' button allows to display it
You can convert all maps in an object to 'Nel Multi Bitmap' maps by using macro script called 'ConvertMaxBitmapToNelBitmapMacroScript'
It operates on the selection, and can convert materials that are either StdMat, NelMaterial, or MultiMaterial.
Once you start using Nel MultiBitmaps, you can toggle which bitmap is displayed in the viewport by using the macro scripts
called SelectNelBitmapSet1..4. Sometimes you may need to refresh the display to get it work..
If a slot hasn't been defined, the first slot is taken as a default.
Note : you can also change the displayed set of texture in the object viewer, in the 'View' menu.
How to use Per-Pixel-Lighting ?
Per pixel lighting i available on GeForce 3 (and above) only for now. On other boards, gouraud shading is used instead. It is based on the blinn model. No bump is applied. Only the nearest light is rendered using p.p.l. Others are rendered using gouraud shading. (to keep single pass rendering). For now, only per instance attenuation is done.
REQUIRED: You model must have one, and only one stage of texture used (but is can use several textures) A continous mapping is needed to applied per pixel lighting techniques.
YOU CAN'T: - You can't use a mesh vertex program when this shader is used. - You can't mix shader that use a vertex program in a single model.
HOW-TO
- Create a NeL Material
- Select the per pixel lighting shader (with or without specular)
- Apply it to your model.
- Apply a mapping and a texture to your model
NeL water material
How to create nel water in Max
NeL support a form of water that can be edited in 3DS Max.
- Create a convex polygon (with z = 0 in object space) for each area of water - Apply a NeL material to this shape - Select water material
For now, full water display is only supported on GeForce 3 (though, it will run with older cards, but will look a lot less nice :( )
The following max map are used to create the water (their name may be misleading, but not all the water maps have an equivalent in max)
- Texture 1 : an environment map that is reflected by water. Basically,
it is obtained by rendering the top hemisphere of the skydome.
- Texture 2 : May be used to set an alternate texture for the env map. - Texture 3 : the same than Texture 1, but for underwater - Texture 4 : the same than Texture 2, but for underwater - Texture 5 : here, you select a heightmap that is used to deform the envmap of the water. (the bumpmap is build from the heightmap) - Texture 6 : The same as the Texture 5, but it is used to deform the previous bumpmap (water animation) - Texture 7 : its alpha and colors are used to modulate the final color and alpha of the water
It is then possible to blend between these 2 map for night / day transition (with the night / day dialog in the object viewer)
Texture coordinates apply only to the diffuse map. This texture may have any orientation provided this orientation is the same over the whole polygon
For the bump map, you can't specify orientation but only speed and scale (in the NeL material)
IMPORTANT: vertices between various water area should be EXACTLY welded, otherwise (big..) holes may result during the rendering.
Skinning support
- >>> The skin must be attached to the root node of the scene.
- >>> The root bone of the skeleton must be attached to the root node of the scene.
- >>> Bones must not have the same name than another node in 3dsmax.
- Support for 4 matrices by vertices max.
-> No support for standard Skin plugin
- Skeletons supported:
* Bones
* Objects (like boxes)
* Biped
* Try other objects !
Animation support
Only those values are animated in the NeL engine:
INODE:
* Position
* Rotation
* Scale (in local basis only)
MATERIAL:
* Ambiant color
* Diffuse color
* Specular color
* Self illumination color (not with the factor but with the color)
* Opacity
- Animated scale is supported, but only when it is done in the 'LOCAL BASIS OF THE MODEL.===
Only those controlers are fully supported:
* Linear float
* Linear point3
* Linear rotation
* Linear scale
* Bezier float
* Bezier position
* Bezier rotation
* Bezier point3
* Bezier scale
* TCB float
* TCB position
* TCB rotation
* TCB point3
* TCB scale
'Watch out:' the Bezier color controler is not supported! Use a point3 interpolation instead.
- Biped controlers are oversampled at export. They are compressed by a post process in build_gamedata
- All the bezier tang mode are supported:
* Smooth
* Linear
* Step
* Fast
* Slow
* User
- The bezier "Constant Velocity" option is *not* supported.
- The loop modes supported in Bezier, TCB and linear are:
* Constant
* Cycle
* Loop
This loop mode must be the same before and after the range. (Same mode for IN and OUT).
Light support
- Export those kind of lights:
* Global ambiant light
* Omni
* Spot (free or target)
* Direct (free or target)
- Export those values from the light:
* Color
* Use diffuse
* Use specular
* Ambiant only
* Multiplier (pseudo)
* Spot Hotspot (pseudo) (directionnal hotspot is not used)
* Spot Fallof (pseudo) (directionnal fallof is not used)
* Far attenuation begin (if the begin attenuation is not 0.f, the far attenuation will be very bad)
* Far attenuation end (pseudo)
- Support of lights
* Omni and spot light only
* Attenuation far
* Exclude mesh from light
* Cast Shadow on light and cast/receive in object properties
* Spot texture projector
* Ambient only
* Multiply factor
* Double sided
* Opacity in texture
* Stained glass in texture through NeL material
- Additionnal features
* Vertex color
* Auto Animated light groups (Color channel with a Point3 controller)
* Lumel size defined
* Oversampling
* Multiple lightmap animatable for one mesh (up to 8)
* Colored lightmap intensity variation
- Opciones de luz no soportadas:
* Luz direccional
* Atenuación
* Tamaño de atenuación escalable
* Proyección rectangular.
20 pages in 3D


