From Ryzom Forge Wiki
(Translation under progress - if you want to complete it, please update this line so that no one will edit it in the meantime)
The aim of this tutorial is to show how to create cuddly toys based on the models of atysian animals.
Contents
- 1 Object of the month: creating and deploying cudlly toys "Atys' mobs" in game
- 1.1 Step 1: choosing the model we'll use for our cuddly toy
- 1.2 Step 2: Getting the model and creating a dedicated work folder
- 1.3 Step 3: Cleaing the 3D model using 3DSMax
- 1.4 Étape 4 : Map the right texture to the model
- 1.5 Étape 5 : Scaling the model
- 1.6 Étape 6 : Adapt the texture for a fluffy look
- 1.7 Step 7 : Shape export
- 1.8 Étape 8 : Tester la peluche IG
- 1.9 Étape 9 : orientation et positionnement d'un objet porté
- 1.10 Étape 9 : Créer l’icône pour l'inventaire et la barre d'actions
- 1.11 Etape 11 : créer le fichiers des noms
- 1.12 Étape 12 : créer le datasheet
- 1.13 Étape 13 : Déployer la peluche sur le serveur et le client de jeu
- 1.13.1 Ajout du datasheet "teddygubani.sitem" au serveur
- 1.13.2 Nettoyages préalables
- 1.13.3 Re-générer le fichier "sheet_id.bin"
- 1.13.4 Re-générer les "*.packed_sheets" et "visual_slot.tab"
- 1.13.5 Copier les fichiers nécessaires coté client
- 1.13.6 Créer un bnp pour le modèle de la peluche
- 1.13.7 Tester IG
- 2 Sources
Object of the month: creating and deploying cudlly toys "Atys' mobs" in game

Prerequisite for modelising only the cuddly toy:
- Having installed Ryzom assets and properly set-up the repositories (NEL tools expect to find the assets in the W:\database folder).
- Having installed 3DSMax and set-up the NEL plugin (Beware the plugin works only with versions 32bits of 3DSMax, and from version 9 till version 2012).
- Advised but not mandatory: having installed the NEL tool "tga2dds.exe".
Prerequisite for deploying the cuddly toy on a game server:
- Having compiled and installed a game server, and having set-up a client to use it.
Note: it is possible to test this cuddly toy IG without having a game server through a trick which will be explained a bit further in this tutorial.
Some usefeul linkds for these prerequisites:
- Downloading the assets and tools: https://ryzomcore.atlassian.net/wiki/display/RC/Downloads+for+Windows
- Set-up the drive letter for the assets : https://ryzomcore.atlassian.net/wiki/display/RC/How+to+set+up+the+Build+Pipeline
- Insalling the NEL plugin of 3DSMax: https://ryzomcore.atlassian.net/wiki/display/RC/Installing+the+Max+Plugins
Step 1: choosing the model we'll use for our cuddly toy
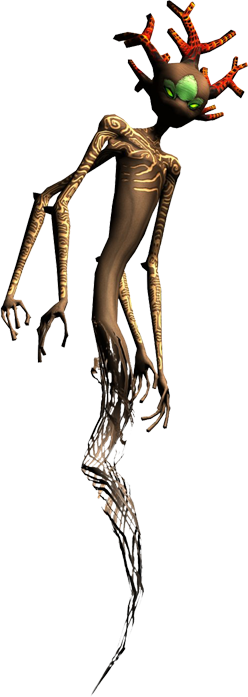
All 3d models for Ryzom fauna are gathered in the "W:\database\stuff\tryker\agents\monsters" folder, by creature family. In this tutorial, we'll use the "Gubani" model, which is located in the "horse" ("cheval" in French) folder, to create our cuddly toy:
W:\database\stuff\tryker\agents\monsters\cheval\h12tr_mo_h12.max

Step 2: Getting the model and creating a dedicated work folder
In 3DSMax, open the "W:\database\stuff\tryker\agents\monsters\cheval\h12tr_mo_h12.max" file.
Use the menu => "File" => "Manage" => "Asset Tracking" to check the list of the files used in this model, especially the textures. Notice this two files:
- The 3d model: "tr_mo_h12.max"
- The texture for the gubani: "ju_mo_h12.png"
![]()
The aim here is to deploy cuddly monbs for the month object. Hence, we'll create a dedicated folder for our to-be toys and respect the naming convention used by Ryzom.
So we'll create a "soft-toy" folder, in the "W:\database\stuff\generique\agents\accessories" folder. We'll save our model by renaming it under: ge_acc_teddy-gubani_01.max
- the first "ge_" prefix in the file name specifies the ecosystem, here _ge_neric (tr: tryker, fy: fyros, etc...).
- the second prefix in the file name specifies the type of model (hom: male homin, mo: monster, wea: weapon, etc...). Here "acc" for _acc_essory.
- and last, the name of our model "teddy-gubani", which will be suffixed with a number, in order to be able to create several variants of the teddy-gubani.
For the texture, we should also copy it under "W:\database\stuff\generique\agents\_textures\accessories", but we'll do it more simply. We'll place it in the same folder as the 3d model and rename it according to the same convention: "ge_acc_teddy-gubani_01.png".
Ryzom core knwo only how to show textures with a ".tga" or ".dds" format. TGA is a raw format without compression which makes it useful for edition, but less efficient in term of memory space. DDS format is a compressed image format which, as jpeg, is destructive. It is the format used internally by Ryzom to minimize the textures' memory space. With your favorite editor, convert the ".png" image into a ".tga" one. That's the one we'll keep for edition. We'll use the NEL tool "'tga2dds'" to generate a texture image under ".dds" format for the 3d model. That's the one which well be used in 3DSMax.
tga2dds ge_acc_teddy-gubani_01.tga
If you don't have this tool, you gan keep the ".tga" version. It will work for the IG tests. In the "soft-toy" folder, you should now have as a result:

Step 3: Cleaing the 3D model using 3DSMax
The monster 3D model contains a skeleton and animation tracks. This is not necessary for a toy accessory and unnecessarily overburden the final ryzom model. We will delete it.

Select with the mouse the "Gubani" model. In the right panel, select the "modify" tab. You should see the mesh called "TR_MO_H12" and in the stack one modifier called "physical". We will delete

Ensuite nous allons ouvrir l'écran affichant les éléments de la scene via le menu "Tools"=> "New Scene Explorer" et supprimer tous les éléments constituant le squelette du modèle pour ne garder au final que le mesh de l'animal.
Then we will open the scene explorer screen via the "Tools" menu => "New Scene Explorer" and delete all the elements constituting the skeleton of the model and keep only the animal mesh.

Now we have only one element in our "scene": the Gubani mesh "TR_MO_H12"

In the right panel, we will rename the mesh "ge_acc_tedy-gubani_01". This name will be used by the export "NEL" to name the generated file when exporting to "shape" NEL format.

Étape 4 : Map the right texture to the model
In this section, we will adapt the texturing of 3d model. In principle, we would just change the base texture "ju_mo_h12.png" to point to our "ge_acc_teddy-gubani_01.dds" texture (or the ". tga" one). However, this will be a bit more complicated:
First we open the "Material Editor" (1) screen, then we select the unique material of the scene (2) by double clicking on it. In the central viewport select the node named "Map # 1 Nel Multi Bitmap" by double clicking on it (3). In the right sidebar, a description of its properties (4) appear. The "Nel Multi Bitmap" allow to specify 8 different images. It is not multi-texturing, but the ability to configure multiple texture images. Only one is applied at a given moment on the model. This is used for the mobs to specify one texture for each ecosystem. This is also used by and environmental objects to specify a different texture for each season.

The ID 1 slot is used for textures of Tryker ecosystem, the second solt (ID 2) for the Fyros ecosystem Fyros. The third slot (ID 3) for Zoraï ecosystem and the fourth one (ID 4) for the Primes Root ecosystem. Do not look for Matis slot. As good aesthetes, they understood that beauty lay in the Zorai nature and therefore use Zoraï textures for all their animals. Note that here the Gubani is being ponly resent in jungle primes root. Only slots 3 and 4 are used
The same system is also used for other IG objects, such as buildings. In this case, the 4 slots correspond to the four seasons. Thus we can note the presence of snow on some Zoraï buildings in winter.

We will not use this mechanism. We will therefore deleted the "NEL Multi Bitmap" and replace it with a simple "Bitmap" by dragging the mouse from the output of "1 tTexture 1" as shown in the above image. When release the mouse, a menu appears (2), select "Bitmap" entry:

Then select our texture "W:\database\stuff\generic\agents\ _textures\accessories\ oft-toyge_acc_teddy gubani_01.dds" (or ".tga").

Repeat the operation on the other "Nel Multi Bitmap" which reference the same image.
Étape 5 : Scaling the model
Our 3d model is almost ready. However, its size does not match what expected. If you use the 3dsmax measuring tool you will see that the Gubani is 2m high. The simplest way to put it in the right size is to load a Homin model to have visual comparison and ensure that the teddybear can be taken in hand.
So we will temporarily put in our scene a reference to another 3d model via the File menu (1) => References (2) => Xref Scene (3) and then clicking on the Add button (4) :

Select the Homin model "W:\database\stuff\generic\agents\actors\male\ge_hom_armor02.max" which should appear in your 3d scene.

Scale the Gubani modeland move via tools "Scale" and "Move" from the popup menu that appears when you click the model with the right mouse button.

Once at the right scale, remove the reference to the homin model through the File menu => References => Xref Scene.
Reposition the Gubani model at the scene origin (x = 0, y = 0, z = 0), because when the object is carried the position (0,0,0) is located in the hand.
Étape 6 : Adapt the texture for a fluffy look
In terms of texture, to give a "plush effect", give free rein to your imagination

I edited the "ge_acc_teddy-gubani_01.tga" image with the Gimp application. I used the filter "Artistic> GIMPressionist" using the "canvas" model for a weft fabric effect.

Once the image saved, I re-generated the dds texture with the command:
tga2dds ge_acc_teddy-gubani_01.tga
Here is the result on the 3d model in 3dsmax:

Step 7 : Shape export
It's time to test the teddybear IG. For this game you have to export the model to the "shape" file used by the Ryzom engine
If this is not already the case I add the NEL export button on your right side panel by clicking on the"utilities" tab thant "More" button and selecting the "NEL Export" option :

Then select the Gubani mesh with the mouse and click on the "Export Model" button. You must specify the folder on wihc the file "ge_acc_teddy-Gubani-01.shape" will be created.

Étape 8 : Tester la peluche IG
Pour bien faire les choses, il faudrait ajouter le datasheet de la peluche au serveur de jeu et patcher le client. Cette méthode sera détaillée plus loin. Cependant il existe une solution de contournement si vous n'avez pas votre propre serveur de jeu pour réaliser ces opérations.
Il faut savoir qu'une peluche n'est rien d'autre qu'une arme équipée. Ainsi nous pourrions remplacer le modèle de la dague par celui de notre gubani pour le tester sur le serveur officiel. Il existe une astuce simple pour cela. Le client de jeu recherche les modèles et textures dans le dossier "user" avant d'aller voir le dossier "data". Il suffit de copier notre fichier shape et la texture associée dans le dossier "user", puis de renommer le shape du gubani en celui de la dague : "GE_Wea_Dague.shape"
A présent lorsque vous équiperez une dague IG, vous aurez en main notre peluche "gubani". Pour retrouver la dague d'origine, il suffit de supprimer le fichier shape du dossier "user" :

En réalisant ce test vous pouvez noter une anomalie : la peluche est tenue par le pied, ce qui n'est pas forcément ce que nous voulons
Étape 9 : orientation et positionnement d'un objet porté
Le point de fixation d'un objet tenu en main correspond au point de coordonnée (0,0,0) de l'objet.Son orientation suit la règle suivante :
 l'axe X remonte le long de l'avant-bras ;
 l'axe Y part depuis le dos de la main vers l'extérieur ;
 l'axe Z pointe vers le haut de l'objet tenu fermement en main.
Nous réorientons la peluche gubani dans 3dsmax comme le montre l'image suivante : l'axe X sort du dos du gubani pour remonter le long du bras qui le portera. L'axe Z sort de la main et est donc dans le prolongement de la tête de la peluche :

Après réorientation du modèle gubani et réexportation du shape nous obtenons enfin une peluche qui est tenue par le tronc :

Pour aller plus loin sur les objets portés, je vous conseille de lire ce tutorial : http://khaganat.net/wikhan/fr:todo:dessiner:creation_d_un_objet_prehensible_en_jeu
Étape 9 : Créer l’icône pour l'inventaire et la barre d'actions
Il faut créer un icône pour l'affichage de l'item peluche gubani dans l'inventaire et dans la barre d'actions. Cet au icône au format tga doit faire 40x40 pixels avec un fond transparent. Nous le nommerons "icon_teddygubani.tga"
L'icône de 40x40 pixels :

Pour des questions de performance, ces icônes ne sont pas stockés individuellement mais regroupés dans une seule image dénommée : "texture_interfaces_v3.tga". Le fichier texte associé dénommé "texture_interfaces_v3.txt" liste les icones présents et leur position dans l'image :

le fichier texte utilise le format suivant pour chaque ligne :
NomFichierIcone u1 v1 u2 v2
Avec :
- u1,v1 la position du point supérieur gauche de l'icône
- u2,v2 la position du coin inférieur droit de l'icône
A la différence des coordonnées en pixels, ces coordonnées qui utilisent la technique du UV Mapping en 3d ont leurs valeurs dans l’intervalle [0 .. 1]. la coordonnée (0,0) correspond au point supérieur gauche de l'image et (1,1) au point inférieur droit de l'image.
Le passage d'un système à l'autre est simple. Soit (x1,y1) la position en pixels du coin haut gauche de notre icône dans l'image globale et (x2,y2) la position du point inférieur droit de l'icône dans l'image, alors :
- u1 = x1 / largeur-image
- v1 = y1 / hauteur-image
- u2 = x2 / largeur-image
- v2 = y2 / hauteur-image
Sachant que la texture "texture_interfaces_v3.tga" fait 1024x1024 pixel, et que dans l'exemple l'icône "icon_teddygubani.tga" se situe à la position (x1=118,y1=798), que le point inférieur gauche étant à la position (x2=157,y2=837), le fichier txt contient donc la ligne :
icon_teddygubani.tga 0.115234375 0.779296875 0.1533203125 0.8173828125
Même si cela peut être ajouté à la main, la bonne méthode et d'utiliser l'outil dédié de NEL build_interface comme indiqué dans le tutorial https://khaganat.net/wikhan/fr:todo:dessiner:creer_icone_objet qui recrée la texture globale et le fichier txt à partir d'un dossier contenant tous les icones.
Note: L'ajout de l'icône ne suffit pas, il faut également créer le datasheet de l'objet peluche et spécifier dedans le nom de notre icône à utiliser comme nous le verrons plus loin dans ce tutorial. Au final nous obtenons le résultat suivant IG :

Etape 11 : créer le fichiers des noms
A compléter.

Étape 12 : créer le datasheet
A la base, une peluche reste est un objet porté comme une arme. De fait le datasheet de la peluche est trs semblable à celui d'une arme une main, comme l'exemple de la dague ci-dessous.
__icrm1pd.sitem ( datasheet de la dague du réfugié ) :__
<?xml version="1.0"?>
<FORM Revision="$Revision: 1.2 $" State="modified">
  <PARENT Filename="_c_m1pd.sitem"/>
  <STRUCT>
    <STRUCT Name="basics">
      <ATOM Name="name" Value="refugee dagger"/>
      <ATOM Name="origin" Value="refugee"/>
      <ATOM Name="Drop or Sell" Value="false"/>
      <ATOM Name="CraftPlan" Value="bcrmea06.sbrick"/>
      <ATOM Name="Saleable" Value="false"/>
    </STRUCT>
    <STRUCT Name="3d">
      <ATOM Name="shape" Value="GE_Wea_Dague.shape"/>
      <ATOM Name="shape_female" Value="GE_Wea_Dague.shape"/>
      <ATOM Name="map_variant" Value="Low Quality"/>
      <ATOM Name="icon background" Value="BK_generic.tga"/>
      <STRUCT Name="fx">
        <ATOM Name="Trail" Value="GE_Wea_Dague_trail_00.shape"/>
      </STRUCT>
    </STRUCT>
  </STRUCT>
  <STRUCT/>
  <STRUCT/>
  <STRUCT/>
  <STRUCT/>
  <LOG>
</FORM>
Ce qui change c'est :
- la référénce au shape dans la section "3d"
     <ATOM Name="shape" Value="ge_acc_teddy-gubani_01.shape"/>
     <ATOM Name="shape_female" Value="ge_acc_teddy-gubani_01.shape"/>
- la référence à l'icone utilisé dans la barre d'état et l'inventaire dans la section "3d"
     <ATOM Name="icon" Value="icon_teddygubani.tga"/>
     <ATOM Name="icon overlay" Value="icon_teddygubani.tga"/>
- les caractéristiques de base qui diffèrent d'une arme : pas de niveau requis, pas de brique de plan, etc..
   <STRUCT Name="basics">
     <ATOM Name="name" Value="staff"/>
     <ATOM Name="origin" Value="common"/>
     <ATOM Name="family" Value="handled item"/>
     <ATOM Name="ItemType" Value="Staff"/>
     <ATOM Name="Bulk" Value="5"/>
     <ATOM Name="RequiredCharacQualityFactor" Value="0"/>
     <ATOM Name="RequiredCharacQualityOffset" Value="0"/>
   </STRUCT>
Voila donc le datasheet de la peluche gubani que nous nommerons "teddygubani.sitem" :
<?xml version="1.0"?>
<FORM Revision="$Revision: 1.7 $" State="modified">
  <PARENT Filename="_c_m1pd.sitem"/>
  <STRUCT>
    <STRUCT Name="basics">
      <ATOM Name="name" Value="staff"/>
      <ATOM Name="origin" Value="common"/>
      <ATOM Name="family" Value="handled item"/>
      <ATOM Name="ItemType" Value="Staff"/>
      <ATOM Name="Bulk" Value="5"/>
      <ATOM Name="RequiredCharacQualityFactor" Value="0"/>
      <ATOM Name="RequiredCharacQualityOffset" Value="0"/>
    </STRUCT>
    <STRUCT Name="3d">
      <ATOM Name="shape" Value="ge_acc_teddy-gubani_01.shape"/>
      <ATOM Name="shape_female" Value="ge_acc_teddy-gubani_01.shape"/>
      <ATOM Name="map_variant" Value="Low Quality"/>
      <ATOM Name="icon" Value="icon_teddygubani.tga"/>
      <ATOM Name="icon background" Value="BK_generic.tga"/>
      <ATOM Name="icon overlay" Value="icon_teddygubani.tga"/>
      <STRUCT Name="fx">
        <ATOM Name="Trail" Value="GE_Wea_Dague_trail_00.shape"/>
      </STRUCT>
    </STRUCT>
  </STRUCT>
  <STRUCT/>
  <STRUCT/>
  <STRUCT/>
  <STRUCT/>
  <LOG></LOG>
</FORM>
Étape 13 : Déployer la peluche sur le serveur et le client de jeu
Afin de déployer la peluche en jeu la méthode officielle consiste à utiliser la pipeline "build_gamedata" (cf. https:ryzomcore.atlassian.net/wiki/display/RC/Gamedata+Build+Pipeline). Je vais vous proposer une méthode différente, où les opérations seront effectués à la mains, mais uniquement celles nécessaires à notre peluche :
Nous avons besoin des fichiers suivants :
- teddygubani.sitem ( le datasheet de la peluche gunabi )
- ge_acc_teddy-gubani_01.shape ( le modèle 3d NEL de la peluche )
- ge_acc_teddy-gubani_01.dds ( la texture du modèle 3d )
De plus le déploiement de cette peluche va impacter les fichiers suivants :
- les fichiers "*.packed_sheets" utilisée par le serveur et le client qui sont une version compilé des datasheets
- le fichier "sheet_id.bin" qui est un index de tous les datasheets utilisés par le jeu
- le fichier "visual_slot.tab" qui liste les éléments affichables coté client
Pour bien faire les choses, nous allons également créer un fichier "soft-toy.bnp" qui contiendra les shapes et les textures de toutes les futures peluches.
Pour la suite des opérations nous partons du principe que notre serveur de jeu fonctionne sous linux, et que les variables d'envrionnement suivantes sont définies :
- LEVELDESIGNPATH pointe sur le dossier des datas du level design
- RYZOM_HOME sur l'installation des sources du serveur
Ajout du datasheet "teddygubani.sitem" au serveur
Coté serveur nous allons créer un dossier dédié pour les datasheets des peluches et y placer celui du gubani :
 $ mkdir $LEVELDESIGNPATH/leveldesign/game_element/sitem/soft-toy
 $ cp teddygubani.sitem $LEVELDESIGNPATH/leveldesign/game_element/sitem/soft-toy
Nettoyages préalables
Re-générer le fichier "sheet_id.bin"
La première étape consiste à regénérer le fichier d'index des datasheet via la commande "make_sheet_id". Il reprend le fichier d'index existant et va le compléter avec les datasheets du dossier $RYZOM_LEVELPATH/leveldesign/game_element/sitem/soft-toy c'est-à-dire les datasheets de nos peluches
$ make_sheet_id -o$LEVELDESIGNPATH/leveldesign/Game_elem/sheet_id.bin $LEVELDESIGNPATH/leveldesign/game_element/sitem/soft-toy
Re-générer les "*.packed_sheets" et "visual_slot.tab"
Il faut regénérer les "*.packed_sheets".Ce sont les versions pré-compilées des datasheets :
$ sheets_packer
Cette commande va également re-générer le fichier visual_slot.tab
Copier les fichiers nécessaires coté client
- Nous copions le fichier "visual_slot.tab" généré dans le dossier courant dans le dossier "user" du client de jeu
- Nous copions le fichier $LEVELDESIGNPATH/leveldesign/Game_elem/sheet_id.bin dans le dossier "user" du client de jeu
- Nous remplaçons les fichiers packet_sheets du dossier "data" du client par ceux générés ici $RYZOM_HOME/code/ryzom/client/data/*.packed_sheets par la commande sheets_packer
Créer un bnp pour le modèle de la peluche
Pour finir il faut copier le shape et la texture de la peluche dans le dossier "data" du client. Cependant pour bien faire les choses, autant créer un fichier ".bnp" dédié. Un fichier ".bnp" est une sorte de zip regroupant les différents fichiers shape, dds, txt, ou autres par thème.
Créer on dossier "soft-toy", copions y tous les shapes et textures de nos peluche, à savoir pour le moment "ge_acc_teddy-gubani_01.shape" et "ge_acc_teddy-gubani_01.dds" et créons un fichier BNP pour les contenur
bnp_make /p soft-toy
La commande va créer un fichier "soft-toy,bnp" qui contiendra nos deux fichiers. A présent il faut le copier dans le dossier "data" du client.
Tester IG
Relancer le serveur avec la commande shard start puis connectez vous avec votre client.
Si tout c'est bien déroulé, en lançant votre client de jeu, vous pouvez créer une peluche dans votre inventaire avec la commande :
/a createItemInBag teddygubani 1 5
Sources
https://khaganat.net/wikhan/fr:todo:dessiner:peluche