From Ryzom Forge Wiki
m |
m (Tamarea moved page ARCC intro EN to EN ARK basis user manual) |
(No difference)
| |
Revision as of 10:43, 18 July 2015
User guide for Ark, short for Ryzom Arkitect.
For historical reasons, those manuals refers very often, almost always, to A.R.C.C.. This is due to the fact that the full documentation has been started with the initial name, ARCC, meaning Advanced Ryzom Content Creator.
Contents
Ark
This guide aims at explaining how to use Ark, the Ryzom Arkitect tool that allows the creation of scripts interpreted by a web server and interacting with Ryzom's server.
Access
Folders and events
Open
((~This is going to have to be changed because of the selection panel that Ulukyn has made which is divided into different areas of the basic tree structure~)) As soon as login on, use finds a page offering access to various areas of the ARCC.
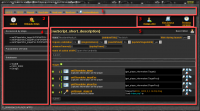
- Zone 1 and Zone 3 allow you to navigate in this tree view.
- Zone 2 allows you to create a new folder or a new event in the displayed portion of Zone 1.
- The first field will contain the name of the object, preferably in English for common data, and preferably without accented or specific characters (â, ñ, ß...)
- The second field is a pulldown selection of options:
- Default value is Folder.
- Second choice, when reading down the list, is Event.
- The third and last field, add, is actually a button. Click on it to start the creation of the object. Notice that hitting the <Enter> key is equivalent to clicking the add button.
- Zone 3 contains the objects, folders or events, which have already been created in a particular level in Zone 1 (here «house»). By selecting one of these you will see the contents of that folder or event. You can back up in the directory tree by selection of a level in Zone 1.
Event
Zone 1 shows the place of the event in the folders tree. Each clickable link allows you to go to the specified folder (but remember to save your progress first).
Creation field (Zone 2)
Zone 2 allows you to create a new script or a new database.
- The first field will contain the name of the object, preferably in English for common data, and preferably without accented or special characters (â, ñ, ß...).
- The second field is a pulldown list of values:
- Default value is Script.
- Second choice is Database.
- The third and last field, add, is actually a button. Click on it to start the creation of the object. Notice that hitting the <Enter> key is equivalent to clicking the add button.
Tools (Zone 3)
Zone 3 contains two tools:
Parameters of the event
((This link does not yet point to anything substantial - Ceru 25 Sept 2014.))
| Set-up |
Automated translations
| How to do automated translations |
Scripts (Zone 4)
Zone 4 contains the scripts created in the event shown in zone 1 (here «New Event»).
The bottom part contains the meaning of the colored bullets appended to the scripts.
The middle part contains the list of the scripts associated to the event.
To each script is associated a set of indicators and actions, listed here bellow as they appear from left to right. (to be checked with the English version of the screenshots)
- Script type:
| A simple script | |
| A linked script, meaning assigned to a NPC |
- Script status, shown as a colored bullet, which meaning appears in the bottom part of the window.
- Name of the script. Clicking on the name of the script allows one to see and edit the content, depending on the user's rights.
- Name of the author who created the script.
- Possible actions on the scripts.
Databases (Zone 5)
| Zone 5 shows the list of the databases of the event. |
Script
- Zone 1 shows the place of the event in the folders tree view down to the event which contains the current scripts.
Eack clickable link allows to go to the intended folder.
- Zone 2 allows to test the script.
- Zone 3 allows to manage the source code and the history of updates.
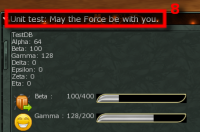
- Zone 4 shows additional information about the running of the script.
- Zone 5 manages the actual creation of the script.
The quickest and least wearying method to create a script is to copy it from another one ressembling to what we want to produce. This method is very useful to create quickly a script that looks like another one, but you'll have to learn how to modify it sooner or later... otherwise, of which use would it be to have two script identical except for their names? That will be explaned in part II of the this user guide for ARCC.
Fill the new script.
Replay sequences 6 to 8 with «Script1»
- 6) open the script
- 7) show the source
- 8) show the source in Base64
Then, click in the already existing text (to place the focus) and select it all (for example: by hitting <Ctrl>+A on Windows and Unices) to replace it with the text saved in the clipboard (for example, by hitting <Ctrl>+V). Once the text has been replaced, save it:
Databases
- Player
- Global
- Civ
- Cult
- Organization (Faction)
- Other
- 3) Number of Rows
- 4) Content (emply when creating it)
Once this function has been activated, the database shows a content like this one.
Here you have a filling of databases with different context.
Running
Running set-up
- 9) Hide during launch (Yes/no)
- 10) Require validation (Yes/No)
- 11) {singleInstance} (Yes/No)
- 12) {resetAtStart} (Yes/No)
- 13) {updateStagesInDb} (Yes/No)
- 14) {missionTimeout} (Units)
- 15) {replayTimer} (Units)
Testing in browser
| You can start by testing the script in the browser by clicking on (1) in the browser. |
It allows to test most or the script proceedings, especially the part about algorithms and displays. Be aware nonetheless to the display which doesn't necessarily appear exactly the same way in the Web and in the WebIG. Indeed some html tags doesn't pass through the last one. For example the <hr/> tag (horizontal rule) doesn't appear in the WebIg, and neither does <br/> (line break). That's why it's better to use bbcode.
To conclude, launching a script in a browser shouldn't be used to check the appearance of a display.
Step by step
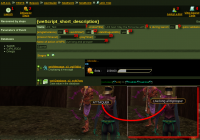
| If a problem appears during the execution, it may be useful to test the proceedings. In this case, click on (2). The following image shows the result for the current example: |
- 18) Each step is moved forward manually
| either simply by clicking on the progess icon, | |
| or by selecting the proposed choice when there is a multiple connection. |
- 19) Columns on the right side show the status of each function in the script.
Yubo
To test the script life-size, it has to be lauchned on the test server known under the name of «Yubo». For this, connect on the «Yubo» with an authorized account, choose preferabily a static NPC (so that you don't have to run behind him for the tests) and, of course, a free one (don't re-use a mission NPC so that you don't get unexpected complications).
Update and removal
| then by adding, | |
| removing, | |
| moving functions, | |
| and of course, by modifiant the content of the functions themselves (here: « weVMessage_v3_True ») which will be seen in Part II. |
Other tools for the Event
Status
| Being edited. | |
| Undergoing testing | |
| Active on Atys and Yubo | |
| Working and locked | |
| Deactivated (to be removed) |
Related rights and shortcuts
63 pages in ARCC


